
This desk makeover for my studio has been the epitome of “make it up as you go alongside.” Once I began the makeover, I had a normal thought of what I wished the desk to seem like when it was completed, however I had not one of the particulars labored out. I knew I wished so as to add some ornamental panels to the edges, and I knew I wished so as to add some drawers. Past that, the main points have simply advanced as I’ve progressed on this undertaking.
The entire “make it up as you go alongside” doesn’t at all times work out, as I shared in my last post about this desk. However final night time, I lastly received the construct for the bottom completed. Now I simply must do some sanding, caulking, priming, and portray, and the bottom will probably be completed. So let me present you what I’ve carried out to get up to now.
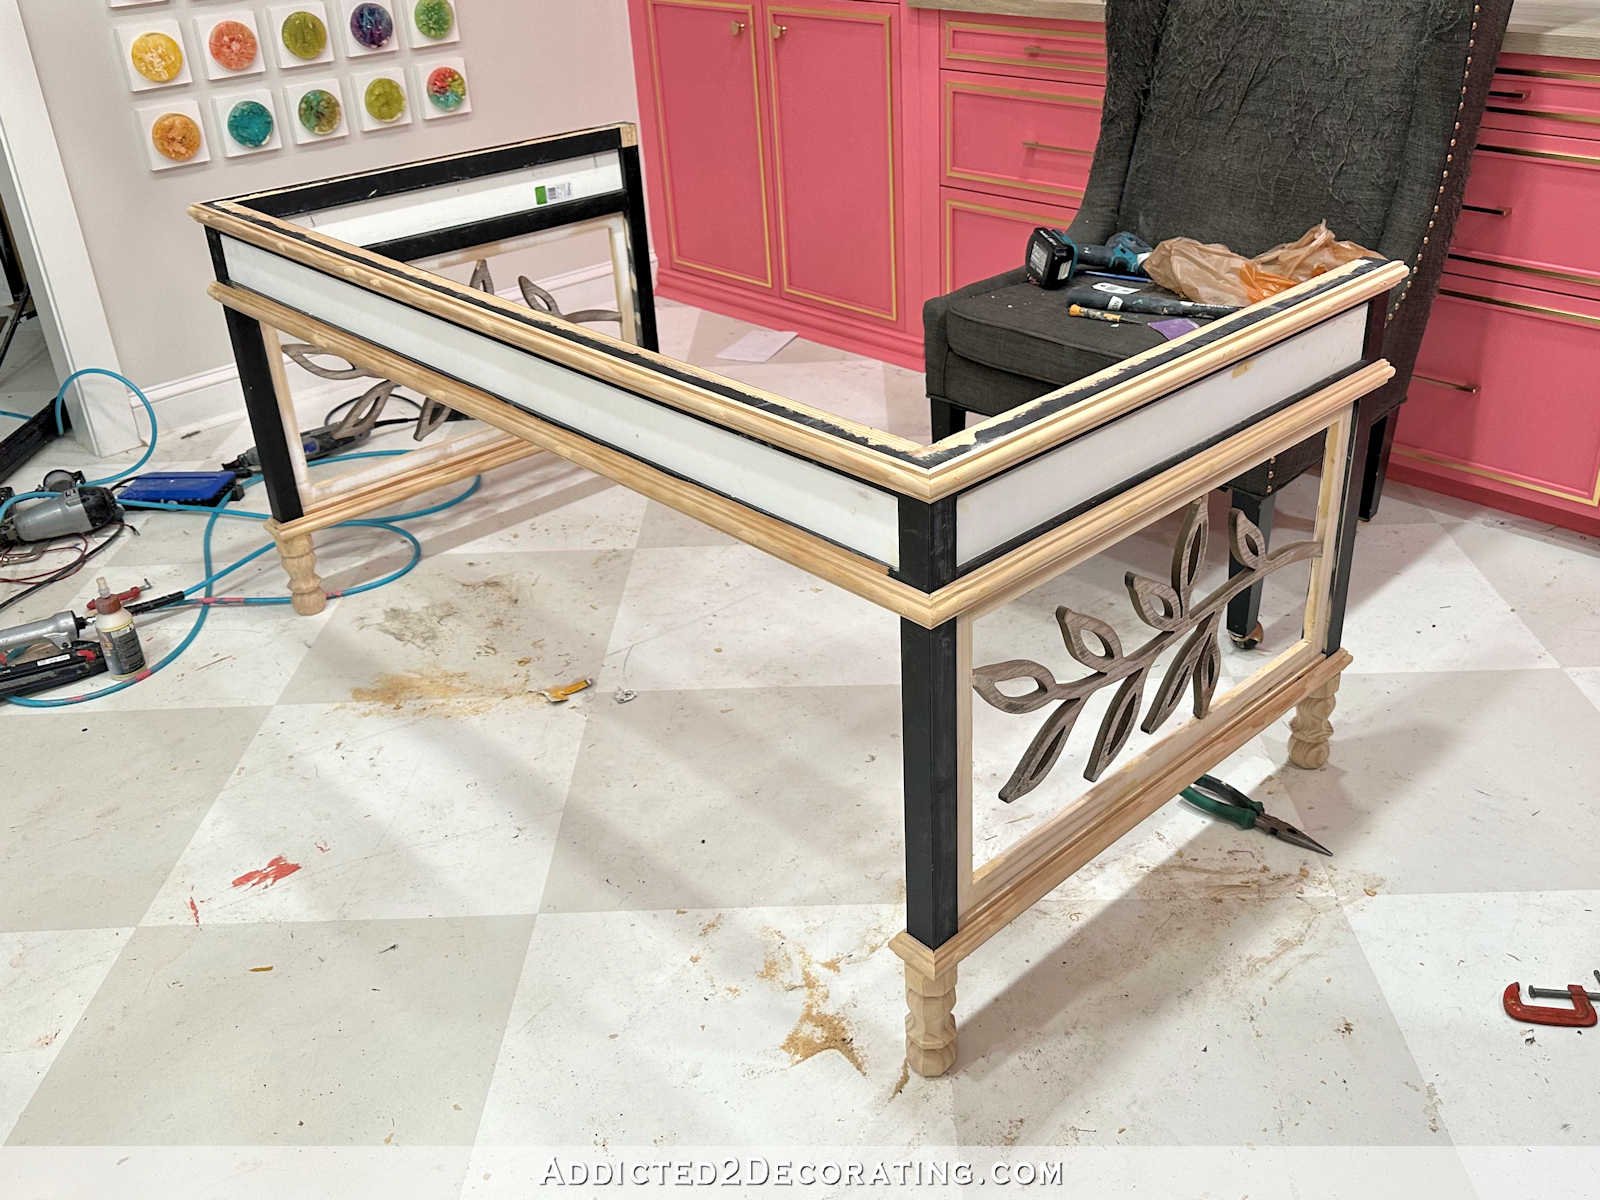
First, let me again up and remind you of the errors that I made on my first try so as to add panels to the present desk. Not solely did I set up the facet ornamental vine panels the wrong way up. (To my eye, the vines wanted to “develop” up and never down.) However I additionally made the error of pondering I may simply add boards to the within of the higher space to cover the drawers that I’ll be including.

So what I ended up with was this — an the wrong way up vine and an higher space that regarded prefer it wished to be an inset panel however failed as a result of the board was set manner too far again. And it regarded awkward having the higher panel and the decrease ornamental panel set at completely different factors on the two″ x 2″ boards that shaped the body of the desk.

To right my errors, I wanted to start out by eradicating the ornamental panel. I used my Dremel Multi-Max to chop alongside the perimeters via the nails that had been holding the panel in. That left some gouges within the body items, so I needed to fill these with wooden filler and sand to clean out the harm.

After which after slicing the piece for the higher panel on my desk noticed in order that it could match contained in the body items, I used a chunk of 1/4-inch board as a spacer to connect it. That is a type of specialty boards that yow will discover at Dwelling Depot or a craft retailer.

So I used this as a spacer whereas putting in the entire panels to ensure they had been all set into the desk body on the similar level.

Right here’s what the highest panel regarded like set contained in the body versus attaching behind the body.

It regarded so a lot better this manner! I connected it utilizing 16-gauge nails shot via the body items above and beneath the panel, and into the perimeters of the panel. (The desktop isn’t presently connected, so I simply moved it over to entry the highest body piece so I may nail via it and into the highest fringe of the panel.)
After which I used the identical spacer to re-install the ornamental panel.

That regarded so a lot better! All the things regarded deliberate and intentional this time. Earlier than, it regarded haphazard and like an afterthought.

Within the photos beneath, you’ll be able to actually see the distinction that it made to convey these higher panels ahead contained in the desk body. Right here’s what it regarded like earlier than with the boards connected to the again of the desk body. Like this, the boards had been set again 1.5 inches…

And right here’s what it seems like after slicing the boards to suit contained in the desk body, and shifting these boards ahead contained in the body in order that they’re set again just one/4 inch…

After getting the entire panels in place, I began including trim. That is the place I actually began making stuff up as I went alongside. 😀 I used some cupboard trim from Dwelling Depot (the sort that’s bought by the 8-foot piece and never by the linear foot) and determined to connect it to the entire horizontal desk body items. I preferred the trim, the panels, and the leaf design. What I didn’t like was how these sq. legs regarded from the underside trim to the ground.

It regarded like I had taken a Parson’s desk and added trim to it to make it look conventional in model. It regarded very odd to my eye. So I headed to Dwelling Depot and purchased some furnishings legs. The size of the leg from the underside of the trim beneath the ornamental panel to the ground was six inches. The one six-inch furnishings legs that had been slender sufficient to make use of on my desk and that I may discover regionally had been these…

I wasn’t thrilled about it. I had vowed by no means to make use of these legs once more on any undertaking as a result of they’re so ubiquitous on DIY furnishings initiatives just because they’re so available at each Dwelling Depot and Lowe’s. However I both had to make use of these or wait a number of days for a web-based order to point out up, and I simply wasn’t prepared to attend. In order that left me with one selection. I had to make use of these.
So I flipped the desk over on its again…

After which I used a handsaw to chop off the leg beneath the trim…

And I used to be left with this…

Dwelling Depot didn’t have the steel inserts that match the screw on these legs, and the plates they promote to simply connect these legs to furnishings had been manner too large to suit this space of my desk. So I simply drilled a gap within the desk leg that was a dimension smaller than the screw prime on the furnishings leg, coated the highest of the furnishings leg with wooden glue, after which screwed it in. Then I bolstered it with some nails shot at an angle via the highest fringe of the legs and angled into the underside of the desk leg. As soon as the glue dried, the brand new legs had been very safe.

After flipping the desk over and repeating that on the again leg, that is what it regarded like.

Although these aren’t my favourite furnishings toes, I assumed this regarded so a lot better than having these plain, sq. legs going all the way in which to the ground.

After repeating that course of on the legs on the opposite facet of the desk, the essential construct for the desk base was completed.

I did get the entire wooden filling carried out final night time earlier than I went to mattress (nail holes, mitered trim corners, and many others.), so I’m hoping that I can get this base completed at the moment.

I’ll must sand the entire wooden filler, after which prime the entire thing and provides it a fast sanding once more earlier than portray. I’ll additionally must do some caulking to repair a number of the areas across the ornamental panels the place my Dremel Multi-Max left some fairly tough cuts. However I’m actually hoping that I can have this completed at the moment and get began on the desktop. I received’t be capable to connect the drawers till the desktop is completed and in place.

Nevertheless it’s coming alongside! I used to be having my doubts about midway via this. In truth, I beginning pondering I ought to simply get on-line and purchase a brand new desk. The one motive I made a decision to push via is as a result of I’ve already bought the walnut veneer for the highest, and I didn’t need that to go to waste. So I pressed on. And I’m so glad I did! I feel as soon as it’s completed, this desk goes to be actually fairly, and one other one-of-a-kind for my studio.

Addicted 2 Adorning is the place I share my DIY and adorning journey as I transform and enhance the 1948 fixer higher that my husband, Matt, and I purchased in 2013. Matt has M.S. and is unable to do bodily work, so I do nearly all of the work on the home on my own. You can learn more about me here.
Trending Merchandise


![Rustic Grey Mason Jar Sconces for Home Decor, Decorative Chic Hanging Wall Decor Mason Jars with LED Strip Lights, 6-Hour Timer, Silk Hydrangea, & Iron Hooks for Home & Kitchen Decorations [Set of 2]](https://m.media-amazon.com/images/I/41DPf4UgGOL._SS300_.jpg)
