
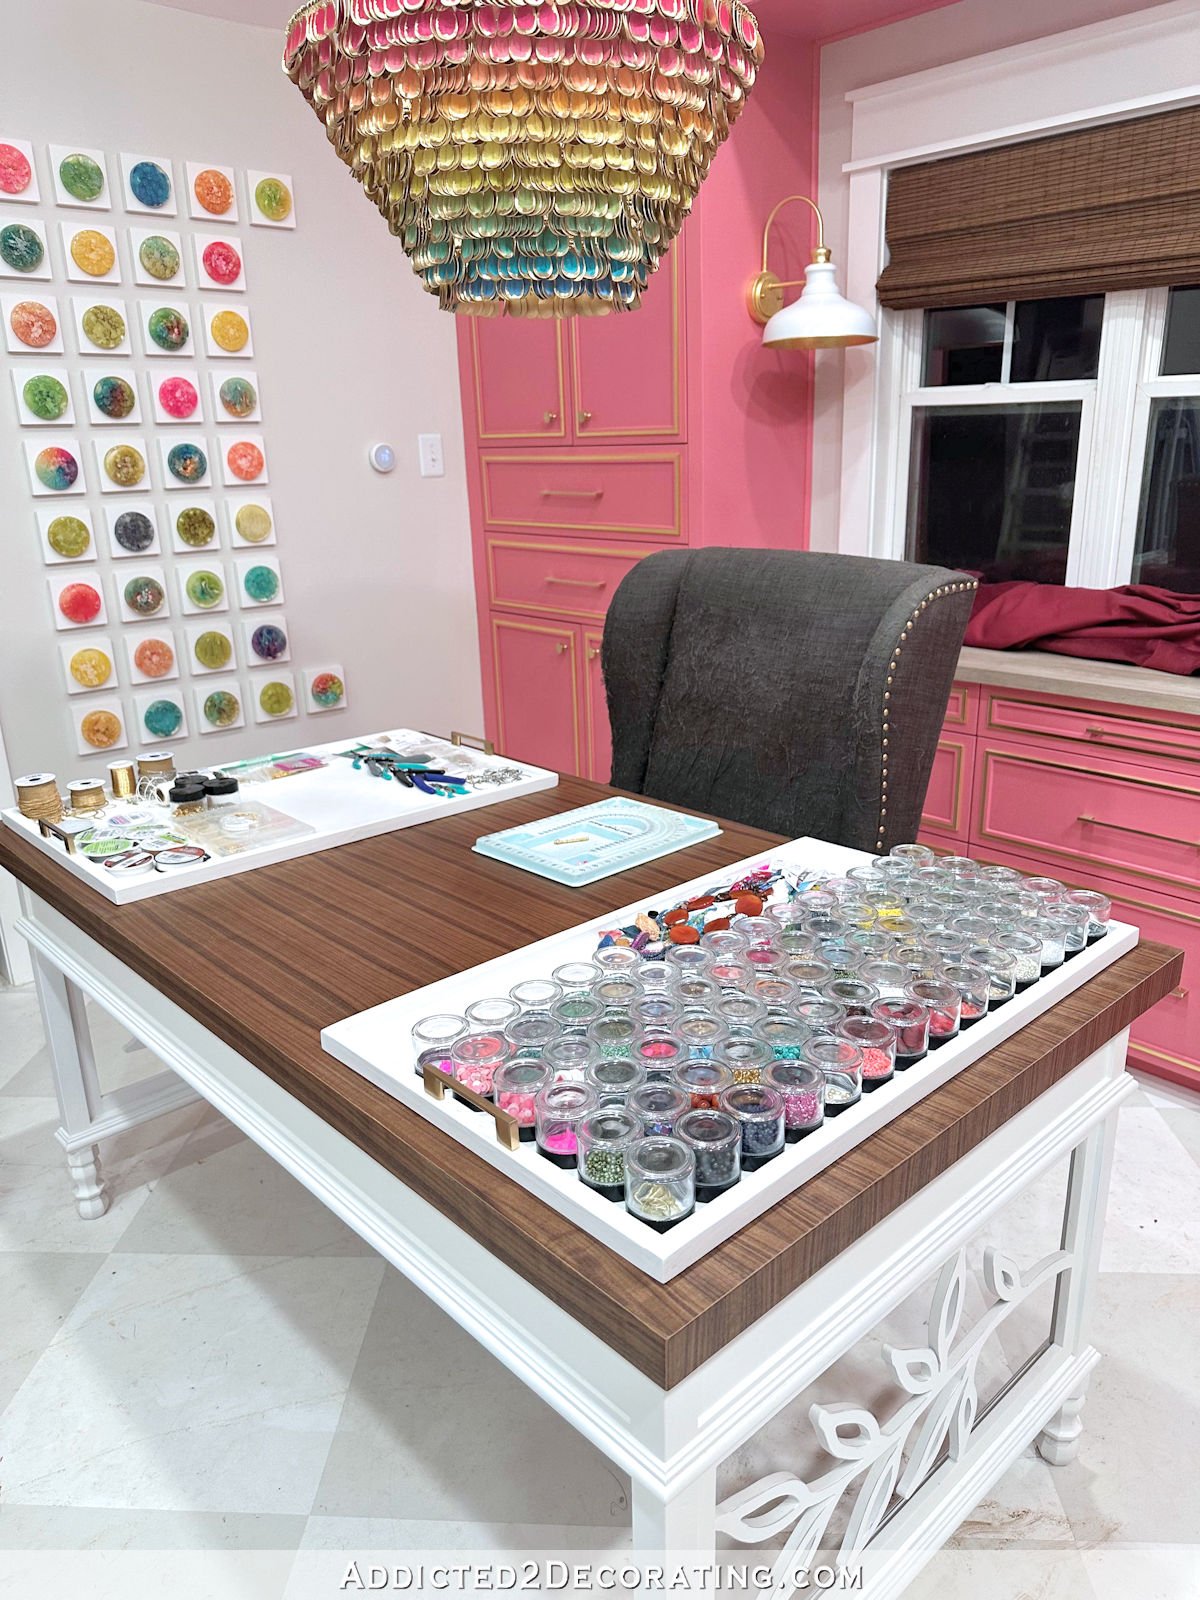
I’ve lastly begun getting my studio organized, and I began with organizing the provides for my present favourite pastime — making jewellery. I didn’t notice what number of provides and beads I had amassed till I began planning out how I used to be going to prepare them. However I got here up with a solution to manage all of it that I’m actually enthusiastic about. For somebody who doesn’t love the method of getting organized, I certain do love the outcomes after a corporation mission is completed. 😀 I’ve gone again simply to have a look at and admire my newly organized storage closet many occasions over the previous couple of days, and I’ve finished the identical factor with my jewelry-making provide drawers during the last 24 hours.
So let me present you what I did. Since jewelry-making provides are all fairly small, I made a decision to make use of three of the very shallow drawers on this center six-drawer cupboard.

And since I work on my jewellery initiatives at my desk, I wanted a solution to simply transport all of my provides and instruments to my desk, after which to simply convey them again to the drawers to retailer them once they’re not in use.
My resolution? Two very straightforward custom-made trays that match the drawers completely! Right here’s the drawer with the tray for all of my instruments and provides aside from the beads. Right here’s a view of it earlier than I added the entire gadgets to the tray so you may see how completely it matches the drawer. The perimeters of IKEA Sektion cupboard drawers are curved, which works out completely as a result of it leaves room for my fingers to wrap across the handles.

And right here’s what it appears like with the provides and instruments on it…

So after I need to work on some jewellery initiatives, I can simply seize the entire tray and take it over to my desk…

To retailer my beads, I purchased two 40-pack bins of these 2-ounce clear jars (affiliate hyperlink). After which I saved them the wrong way up on the tray that I made for this drawer. For this drawer, I sized the tray to the jars fairly than making it to the precise dimension of the drawer in order that the jars wouldn’t slide round. The beads on the again are ones that I haven’t used but, in order that they’re nonetheless intact from the shop.

This tray additionally makes it very straightforward to convey all of my beads over to the desk, and since my desk is fairly huge, each trays match on the desk very simply, with loads of room left within the center for precise work house.

These trays have been really easy to make, they usually price me $0 as a result of I used scraps leftover from previous initiatives. I began by slicing a bit of 1/2-inch plywood to the scale of the underside of the drawer, minus 1.5 inches for every measurement (size and width). Then I minimize come scrap 1″ x 2″ lumber that I had already ripped on the desk noticed (once more, for a earlier mission) in order that the acutal measurements have been 3/4 inch by 1 inch. I used my miter noticed to chop it to size in order that it match the precise dimension on the perimeters of the plywood, after which nailed it into place utilizing 16-gauge 1.5-inch nails. I repeated that on the opposite facet.

After which I minimize items for the back and front to cowl not solely the sting of the plywood, but additionally the ends of the facet body items. In different phrases, I didn’t hassle to miter the corners. I simply minimize all 4 items straight and nailed them on the sting of the plywood.

Then I used wooden filler on all 4 corners and the entire nail holes, after which sanded all the things easy with my sander and 150-grit sanding discs. I went again over all the things by hand and really rapidly with 220-grit sandpaper earlier than priming and portray the trays.

I used Rust-Oleum spray primer, after which sanded once more by hand with 220-grit sandpaper earlier than portray the trays with a brush in Behr Polar Bear (my go-to white paint for trim). When that was dry, I brushed on two coats of General Finishes High Performance Topcoat in a matte finish (affiliate hyperlink). It’s my absolute favourite water-based topcoat, and despite the fact that it’s not really helpful to be used on white paint (for some motive, it will possibly yellow on white paint), I made a decision to likelihood it. That easy end is extra essential to me than the colour.
After which I had some leftover cupboard handles, so I used these as tray handles. And right here’s how the tray regarded when it was completed.

I nonetheless need to get some felt pads to placed on the bottoms of the trays in order that I gained’t have the onerous wooden bottoms of the trays sliding on my desk. However aside from that, these drawers are effectively organized and really helpful.
I discussed that I used three of the drawers for my jewelry-making provides, however the third drawer didn’t require a {custom} sized tray. Right here’s what it appears like for now…

I’m certain this drawer will finish holding extra gadgets sooner or later. However for now, it’s getting used to carry three issues. (1) I’ve a tray that holds my necklaces and earrings which might be in course of however haven’t been completed but. (2) I’ve a container that holds leftover beads from necklaces and earrings that I’ve already made. These don’t get their very own jars as a result of these aren’t seed beads or different filler beads that can be utilized again and again on a number of necklaces. These are extra specialty beads that I don’t actually need to reuse as a result of I have already got a necklace made with them, and I don’t want one other. I’m undecided what I’ll find yourself doing with them. And (3) necklaces which might be completed, however they want changes.
I’ve room to develop in that drawer. Actually, there are issues on the primary provide and gear tray that I don’t use typically, so I may really transfer them to this drawer and provides my fundamental tray a bit extra respiratory room. However for now, these drawers are completed and effectively organized with {custom} trays that make carrying all of my provides to my desk a breeze. I’m fairly enthusiastic about how this group mission turned out!


Addicted 2 Adorning is the place I share my DIY and adorning journey as I rework and enhance the 1948 fixer higher that my husband, Matt, and I purchased in 2013. Matt has M.S. and is unable to do bodily work, so I do the vast majority of the work on the home on my own. You can learn more about me here.
Trending Merchandise


![Rustic Grey Mason Jar Sconces for Home Decor, Decorative Chic Hanging Wall Decor Mason Jars with LED Strip Lights, 6-Hour Timer, Silk Hydrangea, & Iron Hooks for Home & Kitchen Decorations [Set of 2]](https://m.media-amazon.com/images/I/41DPf4UgGOL._SS300_.jpg)
